I’ve heard it said, if you want to sell a lot of books, then write a lot of books. I have done neither. If I did, I would probably have a professional editor, book designer, cover designer, and graphic artist to work on my books, but that gets expensive pretty quickly. So, as with so many other things, I do it myself. Doing it myself doesn’t mean I want it to look shoddy or cheap, so I try to improve a little bit with each attempt.
I’m currently working on RAGING TORRENT, the third book in my UNDERCURRENT series, and thought it would be good to share the process I have used to create cover art and the cover design. If you are a professional graphic designer, avert your eyes now! But if you’re just trying to get a decent, presentable cover for your self-published book, and if you have a bit of computer skills, a little bit of imagination, and a fair amount of time, then this post is for you.
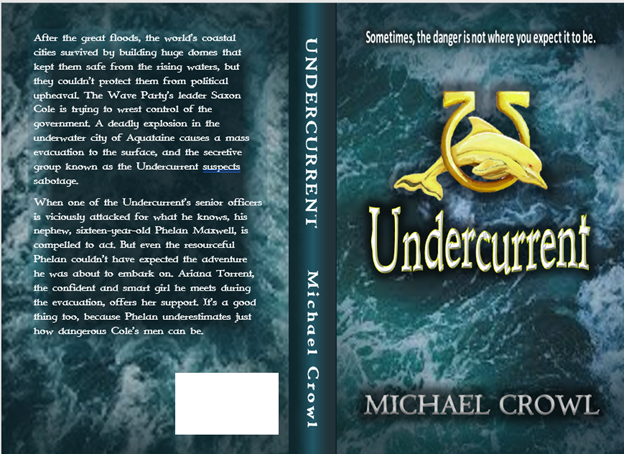
First, let me show you the cover I did for my first book, UNDERCURRENT. Ultimately, you’re going to be producing something like this. This was my first real attempt at a complete book cover, and it took me a long time to get to this point. So let me break down some of the components in this post, and that should get your creative juices flowing. Maybe once you see my process and how I approached this cover, you can get some ideas for how to approach your own. You can do this!
Let’s get right to it and break this down. First things first, the overall size of this image has to be very precise, and you won’t know the final size until you have your book ready for publication and you know how many pages will be in your book. The reason for that is, that you will need to adjust the width of the spine in the graphic. For example, I use Amazon’s Kindle Direct to publish my books, and when you get to the cover section of the process, it will tell you exactly how big to make your cover—and based on the number of pages—exactly how much to add for the width of the book’s spine.
Since I often do judge a book by its cover, I start with that part of the graphic that will be the front of the book, and do all my initial work there. In essence, I’ll work with (in my case) a 5.5-inch x 8.5-inch size, because that’s what will show up everywhere—the cover of the book, the sales page on Amazon, any links to my books from the web page or blogs, and the promotional cards I use to hand out to my potential readers.

(1) THE BACKGROUND IMAGE: I don’t have the original image that I used for this, but it was much more comprehensive that this piece that I used. I searched Google with terms like “stormy ocean” and just looked through the images until I found something I liked. This particular view was zoomed in on that larger image, so I just used a piece of the image that appealed to me and that I thought would work well. For example, maybe I just like the bit of the photo that’s inside the red box below. I’d clip that and use it. But depending on your book, just find an image that you can use (and that is either in the public domain or one that you own the rights to) and start there.

Here’s the clipped image. I like it, but it looks a bit stark to me. For my purposes, I think it’s also a bit too bright. I’d like to darken it a bit. I imported into a Word document so I could manipulate it. If you click on the image in Word, and then on “Picture Format,” you will get some tools that let you mess with the image by tinting it with colors, or changing the texture or style.

SPOILER ALERT: These image tools in Word didn’t get me what I was looking for! So now what am I to do? Well, I need to create another layer of color. Let’s move on to item number 2.
(2) COLOR MASK: I’m going to create a rectangle that’s the same size as the image I’m using, and then I will add color to the image that way. But it’s not that simple. First, draw a rectangle (Insert > Shapes > select the rectangle, and draw one right over the image the size you need). Now the magic can be added through the “Fill” functions.
Your rectangle will likely be a solid block of color. But the image you see here is actually a few colors, and though it looks somewhat solid here, it is actually fairly transparent. If you right click over your new rectangle and select “Format Shape” at the very bottom of the menu, you will get a menu on the right side of your Word document that includes some tools for “Fill” and “Line” options. Let’s concentrate on the Fill menu.

Click on Fill, and you’ll be presented with various options for how you fill your new rectangle with color. You can add a solid fill in the color of your choice, and then adjust the transparency settings to simply get a uniform film of color. But, you can also work with the gradient settings to make it a little more interesting, so that’s what I want to do.

My rectangle here is using a Gradient Fill, in a Radial pattern, emanating from the center. I have four gradient stops in the blue-green range, with one that’s almost black. Each one has a different amount of transparency. This can get both tricky and frustrating, but you can fiddle with each one of the gradient stops and see what works for you. In the end, it’s what you like.
Really, I just play around with the settings, especially the gradient stop placement and transparency for each one of the stops, and that usually gets me where I want to be. In essence, all of them have some degree of transparency. The only other thing I should tell you is, I don’t usually do all this separately with the rectangle. Just leave it over the image you’re putting it over so you can see what it actually looks like as you change the settings. If I’d done that from the beginning, though, I couldn’t have showed you this image of the two pieces stacked on top of each other:

The darkness in the corners is going to be just fine once I get the text on the cover. I’m going to use that darkness to make the words stand out more, but I’ll save that for the next post.
So, can you use the cover creator in Amazon Kindle Direct? Yes you can. Could you hire someone to design your cover? Of course! And, is there better software out there than MS Word that would help you do graphic design and make a cover? Man, I hope so. I just don’t have it. I do have Word, so that’s what I used. I hope you enjoyed this post and I hope you give this a try.
* Next time, I plan to add some text elements and share a little bit on my process for making them look like they belong on the cover.
Talk to you soon, Mike

One thought on “Designing My Own Book Cover: The cheap, basic process I used to make a decent cover for my self-published book”